Adding react-native-image-picker to react-native project
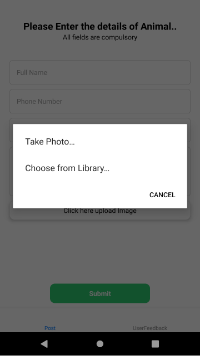
We will use react-native-image-picker library to either to select the image from gallery or to capture the image from camera.
Step 1 — Create a basic React Native app
Step 2 — install react-native-image-picker
npm install react-native-image-picker --save
or
yarn add react-native-image-picker
Now we have to link the dependencies
npx react-native link react-native-image-pickerFor Android we need to add permission to our AndroidManifest.xml
<uses-permission android:name="android.permission.CAMERA" />
<uses-permission android:name="android.permission.WRITE_EXTERNAL_STORAGE"/>
Now your AndroidManifest.xml looks like this
<?xml version="1.0" encoding="utf-8"?>
<manifest xmlns:android="http://schemas.android.com/apk/res/android"
    xmlns:tools="http://schemas.android.com/tools">

    <uses-permission android:name="android.permission.SYSTEM_ALERT_WINDOW"/>
    <uses-permission android:name="android.permission.CAMERA" />
    <uses-permission android:name="android.permission.WRITE_EXTERNAL_STORAGE"/>

    <application android:usesCleartextTraffic="true" tools:targetApi="28" tools:ignore="GoogleAppIndexingWarning" />
</manifest>
The code snippet of ImagePicker
let options = {
      title: 'Select Image',
      customButtons: [
        { name: 'customOptionKey', title: 'Choose Photo from Custom Option' },
      ],
      storageOptions: {
        skipBackup: true,
        path: 'images',
      },
    };

    /**
 * The first arg is the options object for customization (it can also be null or omitted for default options),
 * The second arg is the callback which sends object: response (more info in the API Reference)
 */
ImagePicker.showImagePicker(options, (response) => {
  console.log('Response = ', response);

  if (response.didCancel) {
    console.log('User cancelled image picker');
  } else if (response.error) {
    console.log('ImagePicker Error: ', response.error);
  } else if (response.customButton) {
    console.log('User tapped custom button: ', response.customButton);
  } else {
    const source = { uri: response.uri };

    // You can also display the image using data:
    // const source = { uri: 'data:image/jpeg;base64,' + response.data };

    this.setState({
     filePath: response,
     fileData: response.data,
     fileUri: response.uri
    });
  }
});
Directly Launch Camera
To launch the camera directly we need to use launchCamera().
launchCamera = () => {
    let options = {
      storageOptions: {
        skipBackup: true,
        path: 'images',
      },
    };
    ImagePicker.launchCamera(options, (response) => {
      console.log('Response = ', response);

      if (response.didCancel) {
        console.log('User cancelled image picker');
      } else if (response.error) {
        console.log('ImagePicker Error: ', response.error);
      } else if (response.customButton) {
        console.log('User tapped custom button: ', response.customButton);
        alert(response.customButton);
      } else {
        const source = { uri: response.uri };
        console.log('response', JSON.stringify(response));
        this.setState({
          filePath: response,
          fileData: response.data,
          fileUri: response.uri
        });
      }
    });

  }
Directly Launch Image Library
To launch the camera directly we need to use launchImageLibrary()
launchImageLibrary = () => {
    let options = {
      storageOptions: {
        skipBackup: true,
        path: 'images',
      },
    };
    ImagePicker.launchImageLibrary(options, (response) => {
      console.log('Response = ', response);

      if (response.didCancel) {
        console.log('User cancelled image picker');
      } else if (response.error) {
        console.log('ImagePicker Error: ', response.error);
      } else if (response.customButton) {
        console.log('User tapped custom button: ', response.customButton);
        alert(response.customButton);
      } else {
        const source = { uri: response.uri };
        console.log('response', JSON.stringify(response));
        this.setState({
          filePath: response,
          fileData: response.data,
          fileUri: response.uri
        });
      }
    });

  }
Here is the full working code with hooks.
import React, {useState} from 'react';
import {
View,
Text,
StyleSheet,
ScrollView,
TouchableOpacity,
Image,
} from 'react-native';
import ImagePicker from 'react-native-image-picker';
export const UplpadImage = () => {
const [imageUpload, setImageUpload] = useState([
{
filepath: {
data: '',
uri: '',
},
fileData: '',
fileUri: '',
},
]);
const options = {
title: '',
storageOptions: {
skipBackup: true,
path: 'images',
},
};
const lanuchImage = () =>
ImagePicker.showImagePicker(options, response => {
console.log('Response = ', response);
if (response.didCancel) {
console.log('User cancelled image picker');
} else if (response.error) {
console.log('ImagePicker Error: ', response.error);
} else if (response.customButton) {
console.log('User tapped custom button: ', response.customButton);
} else {
const source = {uri: response.uri};
console.log('response', JSON.stringify(response));
// You can also display the image using data:
// const source = {uri: 'data:image/jpeg;base64,' + response.data};
setImageUpload({
...imageUpload,
fileData: response.data,
filepath: response,
fileUri: response.uri,
});
}
});
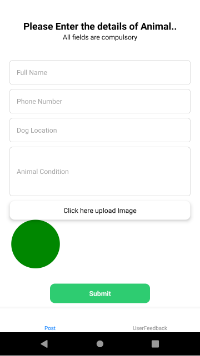
const renderImage = () => {
if (imageUpload.fileData) {
return (
<Image
source={{uri: 'data:image/jpeg;base64,' + imageUpload.fileData}}
style={styles.images}
/>
);
}
};
return (
<View>
<TouchableOpacity
style={styles.imageButtonWrapper}
onPress={() => lanuchImage()}>
<Text style={{textAlign: 'center'}}>Click here upload Image</Text>
</TouchableOpacity>
<ScrollView horizontal={true}>
{renderImage()}
{/* {imageUpload.fileData && <Image source={{uri: imageUpload.fileUri}} />} */}
</ScrollView>
</View>
);
};
const styles = StyleSheet.create({
wrapper: {},
imageButtonWrapper: {
elevation: 5,
backgroundColor: 'white',
paddingHorizontal: 5,
paddingVertical: 10,
borderRadius: 10,
},
images: {
width: 100,
height: 100,
borderRadius: 50,
marginHorizontal: 3,
},
});
Conclusion
In this post, you learned in a quick fashion to implement React Native Image Picker in your React Native App. This enables your app to pick images/videos from the Camera and Gallery.