Walkthrough screens in react-native
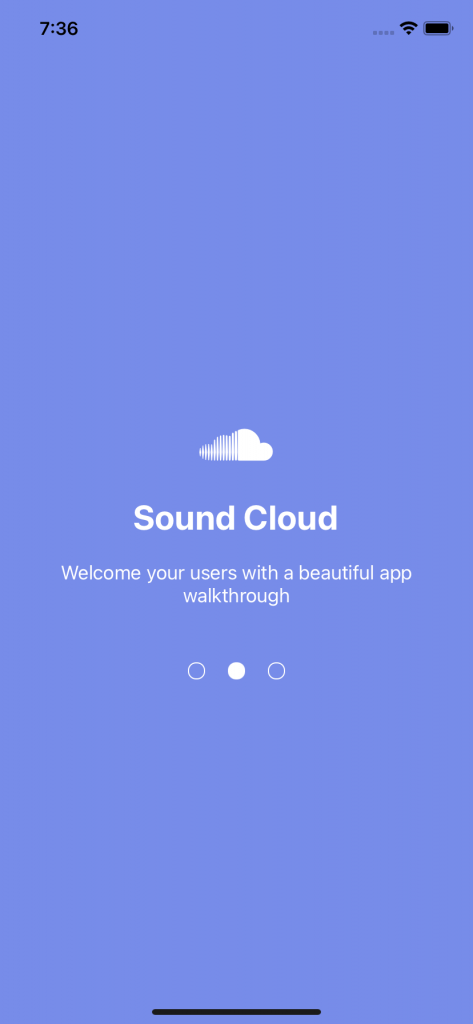
In this tutorial we will cover how to make an UI of walkthrough Screen. Below is the UI which we will achieve.
Lets first create a new expo project with expo initProjectName and start the expo server.
expo init walkthroughScreen
cd walkthroughScreen
expo start
Lets install the dependencies
expo install react-native-swiperLet me explain the below code.
import React from "react";
import { View, Text, StyleSheet, Dimensions, Image } from "react-native";
import Swiper from "react-native-swiper";
import Colors from "./Colors";
import { Entypo } from "@expo/vector-icons";
import { FontAwesome } from "@expo/vector-icons";
const { height, width } = Dimensions.get("window");
const walkthrouhhtitleList = [
{
id: 1,
title: "Educate",
desc: "Showcase features to new users so that they get to love your app",
icon:
{walkthrouhhtitleList.map((i) => {
return (
{i.icon}
{i.title}
{i.desc}
);
})}
);
}
const styles = StyleSheet.create({
wrapper: {},
slide1: {
flex: 1,
justifyContent: "center",
alignItems: "center",
backgroundColor: Colors.backgroundColor,
},
textDesc: {
fontSize: 17,
color: "#ffff",
paddingHorizontal: 20,
textAlign: "center",
// marginTop: 20,
},
text: {
color: "#fff",
fontSize: 30,
fontWeight: "bold",
marginVertical: 20,
},
});
In the first 6 lines we have imported
line 10-31
we have created a list of array object with id, title, desc and icon
In line 35-62
we have a feature which we want to display while swiping
In line 63-71
We have display the list walkthrough pages, with title, icon and desc
Conclusion
Here, We are displaying a list of the array objects, we can also display components instead of lists as well.
I have attach the github link to the above code.